


v2board+XrayR搭建科学上网-后端搭建教程
本文最后更新于 2024-08-04,文章内容可能已经过时!
本文章仅供学习和测试使用
准备工作
一台搭建了v2board的服务器
一台境外VPS
一、安装XrayR
一键安装
wget -N https://raw.githubusercontent.com/XrayR-project/XrayR-release/master/install.sh && bash install.shDocker安装
git clone https://github.com/XrayR-project/XrayR-release && cd XrayR-release

vim config.yml						//编辑配置文件

docker-compose up -d //启动二、编辑config.yml(文档)
编辑etc/XrayR/config.yml
Log:
  Level: none # Log level: none, error, warning, info, debug
  AccessPath: # /etc/XrayR/access.Log
  ErrorPath: # /etc/XrayR/error.log
DnsConfigPath: # /etc/XrayR/dns.json # Path to dns config, check https://xtls.github.io/config/dns.html for help
RouteConfigPath: # /etc/XrayR/route.json # Path to route config, check https://xtls.github.io/config/routing.html for help
InboundConfigPath: # /etc/XrayR/custom_inbound.json # Path to custom inbound config, check https://xtls.github.io/config/inbound.html for help
OutboundConfigPath: # /etc/XrayR/custom_outbound.json # Path to custom outbound config, check https://xtls.github.io/config/outbound.html for help
ConnectionConfig:
  Handshake: 4 # Handshake time limit, Second
  ConnIdle: 10 # Connection idle time limit, Second
  UplinkOnly: 2 # Time limit when the connection downstream is closed, Second
  DownlinkOnly: 4 # Time limit when the connection is closed after the uplink is closed, Second
  BufferSize: 64 # The internal cache size of each connection, kB
Nodes:
  -
    PanelType: "NewV2board" # Panel type: SSpanel, NewV2board, V2board, PMpanel, Proxypanel
    ApiConfig:
      ApiHost: "http://127.0.0.1:667"
      ApiKey: "123"
      NodeID: 41
      NodeType: V2ray # Node type: V2ray, Trojan, Shadowsocks, Shadowsocks-Plugin
      Timeout: 30 # Timeout for the api request
      EnableVless: false # Enable Vless for V2ray Type
      EnableXTLS: false # Enable XTLS for V2ray and Trojan
      SpeedLimit: 0 # Mbps, Local settings will replace remote settings, 0 means disable
      DeviceLimit: 0 # Local settings will replace remote settings, 0 means disable
      RuleListPath: # /etc/XrayR/rulelist Path to local rulelist file
    ControllerConfig:
      ListenIP: 0.0.0.0 # IP address you want to listen
      SendIP: 0.0.0.0 # IP address you want to send pacakage
      UpdatePeriodic: 60 # Time to update the nodeinfo, how many sec.
      EnableDNS: false # Use custom DNS config, Please ensure that you set the dns.json well
      DNSType: AsIs # AsIs, UseIP, UseIPv4, UseIPv6, DNS strategy
      DisableUploadTraffic: false # Disable Upload Traffic to the panel
      DisableGetRule: false # Disable Get Rule from the panel
      DisableIVCheck: false # Disable the anti-reply protection for Shadowsocks
      DisableSniffing: false # Disable domain sniffing
      EnableProxyProtocol: false
      AutoSpeedLimitConfig:
        Limit: 0 # Warned speed. Set to 0 to disable AutoSpeedLimit (mbps)
        WarnTimes: 0 # After (WarnTimes) consecutive warnings, the user will be limited. Set to 0 to punish overspeed user immediately.
        LimitSpeed: 0 # The speedlimit of a limited user (unit: mbps)
        LimitDuration: 0 # How many minutes will the limiting last (unit: minute)
      GlobalDeviceLimitConfig:
        Enable: false # Enable the global device limit of a user
        RedisAddr: 127.0.0.1:6379 # The redis server address
        RedisPassword: YOUR PASSWORD # Redis password
        RedisDB: 0 # Redis DB
        Timeout: 5 # Timeout for redis request
        Expiry: 60 # Expiry time (second)
      EnableFallback: false # Only support for Trojan and Vless
      FallBackConfigs:  # Support multiple fallbacks
        -
          SNI: # TLS SNI(Server Name Indication), Empty for any
          Alpn: # Alpn, Empty for any
          Path: # HTTP PATH, Empty for any
          Dest: 80 # Required, Destination of fallback, check https://xtls.github.io/config/fallback/ for details.
          ProxyProtocolVer: 0 # Send PROXY protocol version, 0 for dsable
      CertConfig:
        CertMode: dns # Option about how to get certificate: none, file, http, dns. Choose "none" will forcedly disable the tls config.
        RejectUnknownSni: false # Reject unknown SNI
        CertDomain: "node1.test.com" # Domain to cert
        CertFile: /etc/XrayR/cert/node1.test.com.cert # Provided if the CertMode is file
        KeyFile: /etc/XrayR/cert/node1.test.com.key
        Provider: alidns # DNS cert provider, Get the full support list here: https://go-acme.github.io/lego/dns/
        Email: test@me.com
        DNSEnv: # DNS ENV option used by DNS provider
          ALICLOUD_ACCESS_KEY: aaa
          ALICLOUD_SECRET_KEY: bbb
  -
    PanelType: "NewV2board" # Panel type: SSpanel, V2board
    ApiConfig:
      ApiHost: "http://V2board.com"
      ApiKey: "123"
      NodeID: 42
      NodeType: Trojan # Node type: V2ray, Shadowsocks, Trojan
      Timeout: 30 # Timeout for the api request
      EnableVless: false # Enable Vless for V2ray Type, Prefer remote configuration
      EnableXTLS: false # Enable XTLS for V2ray and Trojan, Prefer remote configuration
    ControllerConfig:
      ListenIP: 0.0.0.0 # IP address you want to listen
      UpdatePeriodic: 60 # Time to update the nodeinfo, how many sec.
      EnableDNS: false # Enable custom DNS config, Please ensure that you set the dns.json well
      CertConfig:
        CertMode: dns # Option about how to get certificate: none, file, http, dns. Choose "none" will forcedly disable the tls config.
        CertDomain: "node2.test.com" # Domain to cert
        CertFile: /etc/XrayR/cert/node2.test.com.cert # Provided if the CertMode is file
        KeyFile: /etc/XrayR/cert/node2.test.com.key
        Provider: alidns # DNS cert provider, Get the full support list here: https://go-acme.github.io/lego/dns/
        Email: test@me.com
        DNSEnv: # DNS ENV option used by DNS provider
          ALICLOUD_ACCESS_KEY: aaa
          ALICLOUD_SECRET_KEY: bbb
上面代码有2个节点,下面是需要修改的参数
    PanelType: "NewV2board" # 后端
    ApiConfig:
      ApiHost: "http://127.0.0.1:667" # 搭建V2board的域名
      ApiKey: "123" # 通讯密钥
      NodeID: 41 	#节点
      NodeType: V2ray # 协议


      CertConfig:
        CertMode: dns # dns可以用Cloudflare的或者改成filt自己上传证书
        CertDomain: "node2.test.com" # 节点域名(不用443端口就只填写这个)
        CertFile: /etc/XrayR/cert/node2.test.com.cert #证书存放位置
        KeyFile: /etc/XrayR/cert/node2.test.com.key	  #证书密钥存放位置
        Provider: alidns # 上面选择DNS的这里填写Cloudflare
        Email: test@me.com #Cloudflare邮箱
        DNSEnv: # DNS ENV option used by DNS provider
          ALICLOUD_ACCESS_KEY: aaa	# Cloudflare邮箱(用cf把前面改成后面的)	CLOUDFLARE_EMAIL: aaa
          ALICLOUD_SECRET_KEY: bbb	# CloudflareAPI密钥(用cf把前面改成后面的)	CLOUDFLARE_API_KEY: bbb
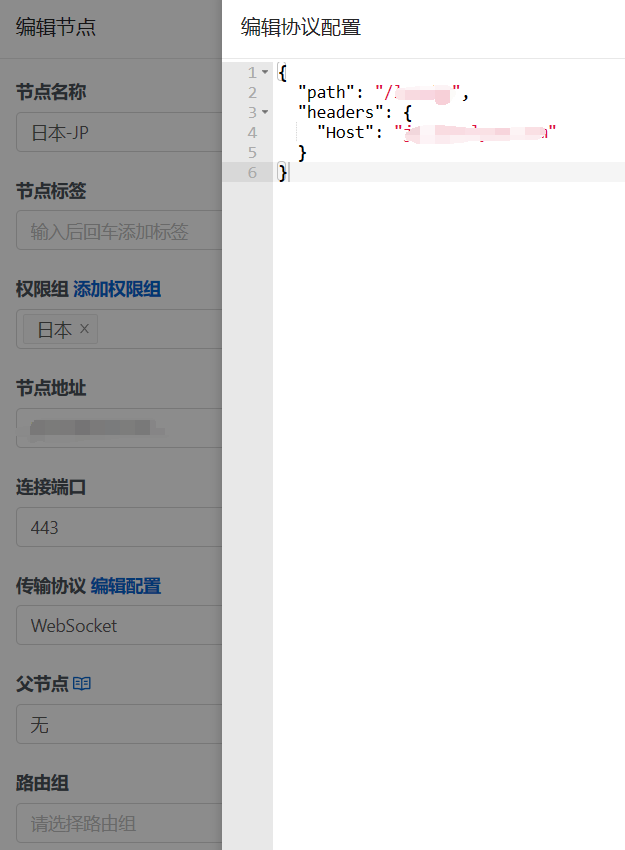
三、后端设置
VMess设置(节点地址自己解析的域名,协议配置第一随便填,第二个为伪装域名,随便填)
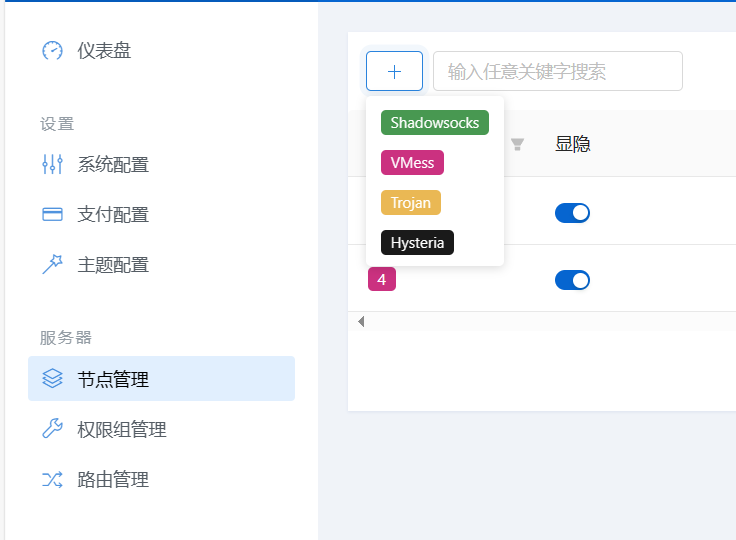
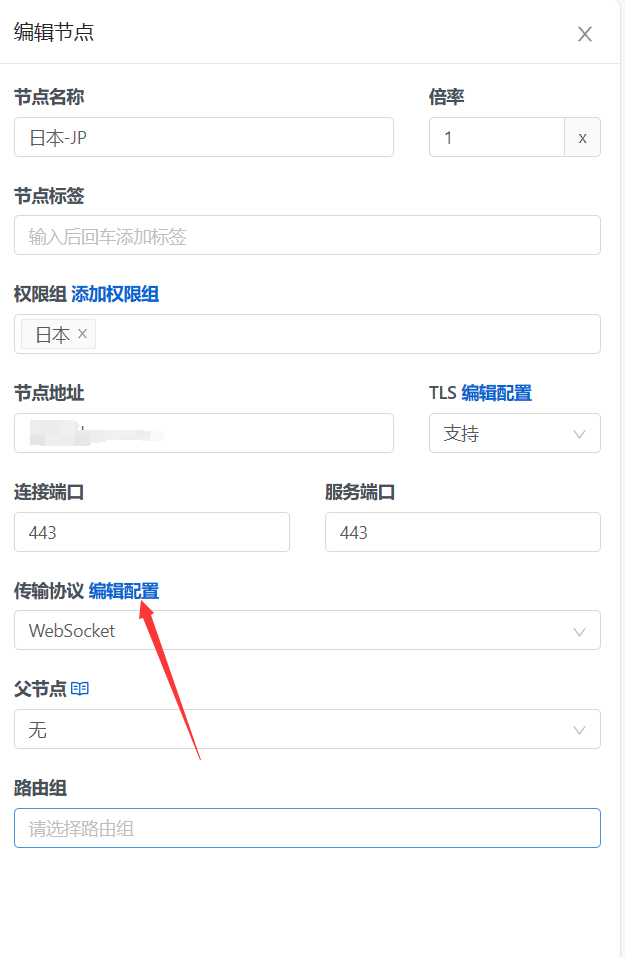
Trojan设置(这协议默认需要https,自行设置SSL,服务器名称指示(sni)和节点地址相同)

宝塔面板+V2Board搭建科学上网-前端搭建教程
本文是原创文章,采用 CC BY-NC-ND 4.0 协议,完整转载请注明来自 彼岸SKY

评论
隐私政策
你无需删除空行,直接评论以获取最佳展示效果